How to Stream on Twitch with OBS (A Complete Setup Guide)

Want to start streaming on Twitch but don’t know where to begin with OBS Studio?
You’re in the right place. This step-by-step guide covers everything you need to know, from the initial OBS setup for Twitch to going live.
Even if you’ve never used OBS before, just follow these instructions from top to bottom, and you’ll be streaming in no time.
1. Getting Your Equipment Ready
Before we dive into the software, make sure you have the necessary hardware: a PC, a microphone, and an audio interface. You should also create your Twitch account in advance.
Note: For high-quality game streaming or VTubing, a powerful computer is essential. If you’re concerned about your PC’s performance, check out our guides on choosing the right equipment:
- [Link] The Best Gaming PCs for Streaming
- [Link] The Best Laptops for Streaming
2. Downloading and Installing OBS
First, let’s get OBS Studio installed on your computer.
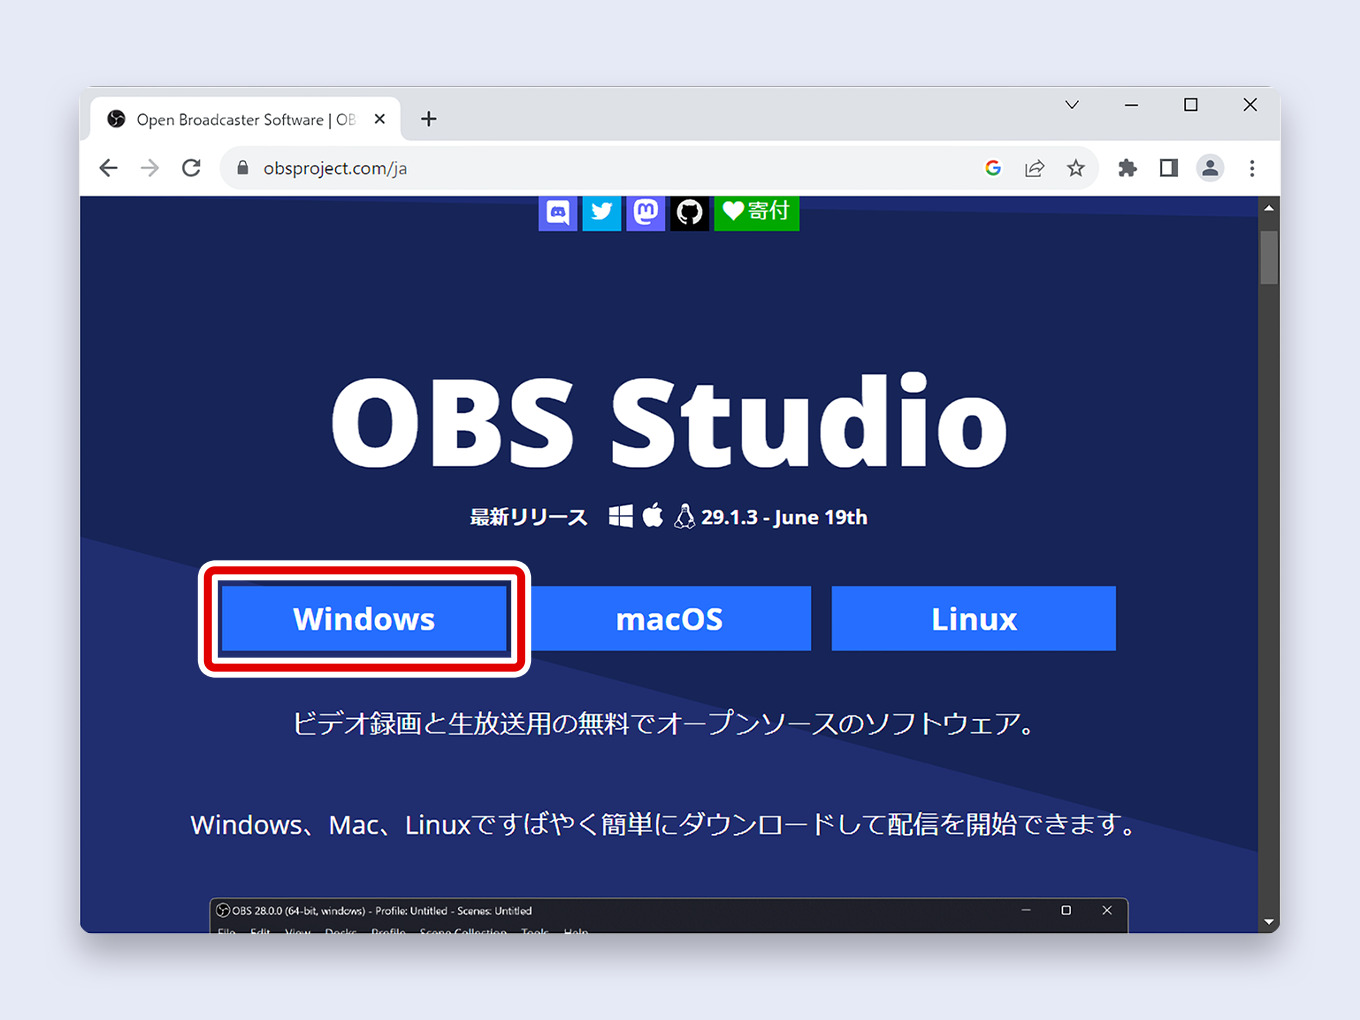
1. Go to the official OBS Project website.
2. Click the Windows button to download the installer.
3. Run the downloaded file to install OBS.

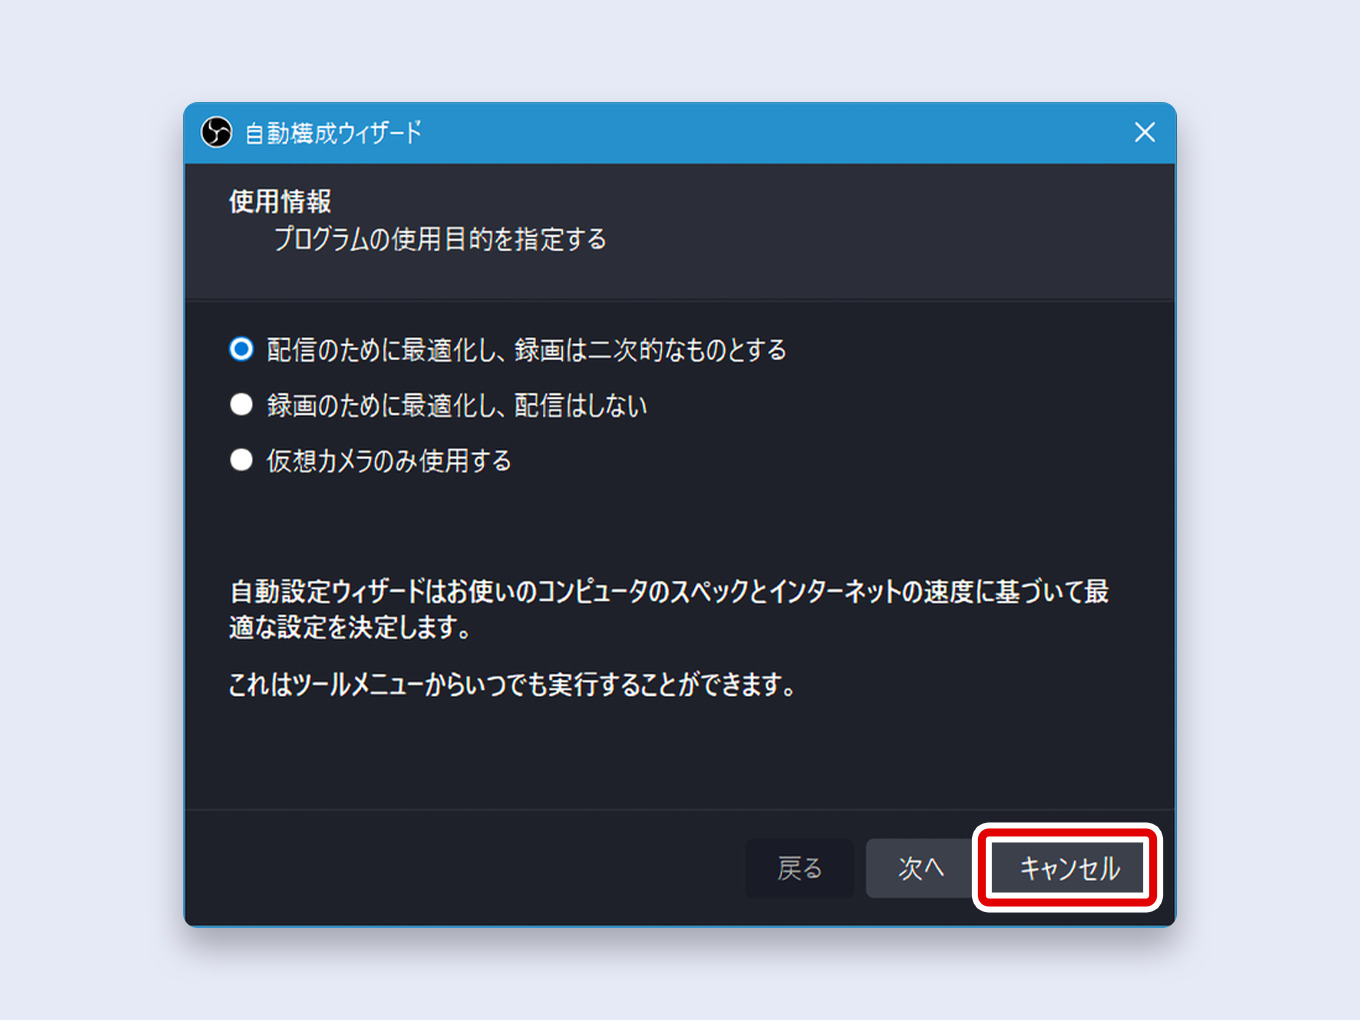
4. When OBS launches for the first time, it will prompt you with the Auto-Configuration Wizard. Click Cancel for now, as we will configure everything manually in this guide.

3. Connecting OBS to Twitch
The easiest and most secure way to connect OBS to Twitch is by linking your account directly.
1. In OBS, go to File > Settings.
2. Navigate to the Stream tab.
3. For the “Service” dropdown, select Twitch.
4. Click the Connect Account (recommended) button.
5. A new window will open. Log in with your Twitch username and password.
6. Once the settings window shows a “Disconnect Account” button, the connection is complete. Click Apply.
4. Configuring Video and Audio Settings
This section covers the best OBS settings for Twitch to ensure a high-quality stream.
Output Settings
1. In the Settings window, go to the Output tab.
2. Set Output Mode to Advanced.
3. Click the Streaming tab and configure the following settings:
| Audio Encoder | FFmpeg AAC (or CoreAudio AAC) |
|---|---|
| Video Encoder | NVIDIA NVENC H.264 or AMD HW H.264. Always use your GPU’s hardware encoder if available. Use x264 only as a last resort. |
| Rescale Output | Disabled |
| Rate Control | CBR |
| Bitrate | 6000 Kbps |
| Keyframe Interval | 2 |
| Preset | P5: Slow (Good Quality) |
| Tuning | High Quality |
| Multipass Mode | Two Passes (Quarter Resolution) |
| Profile | high |
| Look-ahead | Checked |
| Psycho Visual Tuning | Checked |
| GPU | 0 |
| Max B-frames | 2 |
4. Next, click the Audio tab within the Output settings. Set the Audio Bitrate for Track 1 to 160. (For superior quality with a great mic, you can use 320, as Twitch unofficially supports it).
5. Click Apply.
Audio Settings
1. In the main Settings window, go to the Audio tab.
2. Set Sample Rate to 48 kHz. (Ensure this matches your audio interface’s settings).
4. Under Global Audio Devices, set Desktop Audio to Default and Mic/Auxiliary Audio to your connected microphone.
Video Settings
1. Go to the Video tab.
2. Set Base (Canvas) Resolution to match your monitor’s native resolution (e.g., 1920×1080).
3. Set Output (Scaled) Resolution to 1920×1080. This is the resolution your stream will be broadcast in.
4. Set Common FPS Values to 30 for standard streams or 60 for fast-paced gaming.
5. Click OK to save all settings.
Mastering Your Microphone Audio
Clear audio is crucial. Let’s add some of the best audio filters for OBS to make your voice sound professional.
1. In the Audio Mixer dock, find your Mic source. Click the three dots (…) and select Filters.
2. Click the + icon to add the following filters in this exact order:
2-1. Gain: Add this filter. While speaking normally, increase the gain until your voice meter peaks in the yellow section, occasionally touching the red. If your audio is already loud enough, you can skip this filter.
2-2. Noise Suppression: Add this and select RNNoise (good quality, low CPU usage) from the dropdown. This will remove constant background noise.
2-3. Limiter: Add this and set the Threshold to -1.0 dB and Release to 60ms. This prevents your audio from distorting if you get loud.
3. Ensure the eye icon is active for all three filters, confirming they are enabled.
4. Click Close.
5. Building Your Stream Scene
A “Scene” in OBS is your stream’s layout. A “Source” is an element within that layout, like your game, webcam, or an overlay.
Adding an Image Overlay
1. In the Sources panel, click the + button.
2. Select Image.
3. Give it a name (e.g., “Stream Border”) and click OK.
4. Click Browse and select your image file. Click OK.
5. You can now drag the red handles to resize and position the image on your canvas.
Displaying Your Twitch Chat
Here’s how to add your Twitch chat to your OBS scene:
1. On Twitch, go to your channel’s chat panel.
2. Click the gear icon (Chat Settings) and select Popout Chat.
3. A new window will open. Copy the URL from its address bar.
4. Back in OBS, click + in the Sources panel and select Browser.
5. Name it “Twitch Chat” and click OK.
6. Paste the copied URL into the URL field.
7. Click OK. You can now resize and position the chat box on your stream.
6. Adding Background Music (BGM)
The simplest way to add BGM is to play it from your computer.
1. Open a browser and play royalty-free music from YouTube or use a desktop music app.
2. In the OBS Audio Mixer, you will see the Desktop Audio meter moving.
3. Lower the slider for Desktop Audio until the music is at a quiet background level, well below your microphone’s volume.
7. Starting and Ending Your Stream
With all settings configured, you’re ready to go live on Twitch from OBS.
To begin, click the Start Streaming button in the Controls dock (bottom-right).
To finish, simply click Stop Streaming.